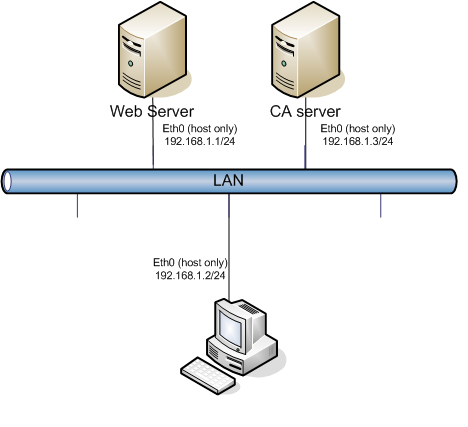
Cài đặt và cấu hình Zabbix

 Linux  Comments Off on Cài đặt và cấu hình Zabbix
Sep 072015
 

1. Yêu cầu hệ thống


a. Yêu cầu các gói phần mềm: GCC, Automake, MySQL (http://www.mysql.com/)


·        zlib-devel


·        mysql-devel (for MySQL support)


·        glibc-devel


·        curl-devel (for web monitoring)


·        libidn-devel (curl-devel might depend on it)


·        openssl-devel (curl-devel might depend on it)


·        net-snmp-devel (for SNMP support)


·        popt-devel (net-snmp-devel might depend on it)


·        rpm-devel (net-snmp-devel might depend on it)


·        OpenIPMI-devel (for IPMI support)


·        libssh2-devel (for direct SSH checks)


b. Yêu cầu phần cứng hệ thống:  
         RAM: 128MB
         CPU Pentium II trở lên.

  Các thành phần của hệ thống zabbix: zabbix-server, zabbix-agent, zabbix-proxy

2. Cài đặt:
a. Cài đặt các thành phần liên quan:
– Cài đặt Apache, PHP: bạn có thể sử dụng câu lệnh:

yum install apache php

– Khởi động apache

service httpd restart


Cấu hinh Certificate Authorization trên Linux

 Linux  Comments Off on Cấu hinh Certificate Authorization trên Linux
Sep 072015
 

I. Mô hình


Hướng dẫn chuẩn bị hệ thống như hình vẽ

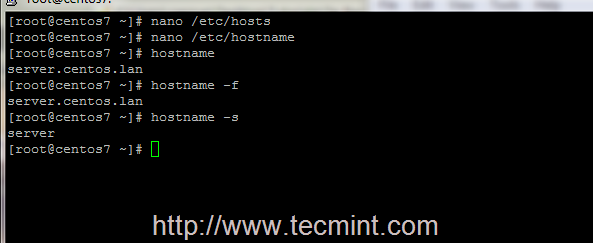
1.      Cấu hình card mang ở chế độ host-only
2.      Cấu hình địa chỉ Ip như hình vẽ và kiểm tra kết nối
3.      Cấu hình DNS với bản sau
Server
Server Name
IP
CA server
ca.lablinux.vn
192.168.1.3/24
Web Server
web.lablinux.vn
192.168.1.2/24
client
client.lablinux.vn
192.168.1.1/24
4.      Kiểm tra cấu hình
[root@client  tmp]# ping ca.lablinux.vn
[root@client  tmp]# ping web.lablinux.vn

Khởi tạo Certificate Authorization Server

5.      Kiểm tra bộ cài
[root@ca  tmp]# rpm –q  openssl
6.      Tạo thư mục thử nghiệm
[root@ca tmp]# mkdir -m 0755  /etc/pki
7.      Tạo thư mục để lưu CA
[root@ca tmp]# mkdir -m 0755 /etc/pki/myCA  /etc/pki/myCA/private   /etc/pki/myCA/certs  /etc/pki/myCA/newcerts   /etc/pki/myCA/crl
[root@test myCA]# touch index.txt
[root@test myCA]# echo '01' > serial
8.      Tạo file cấu hình:
[root@ca pki]#cd /etc/pki/myCA
[root@ca  myCA]#vi  testssl.conf
[ ca ]
default_ca      = CA_default            # The default ca section
[ CA_default ]
 dir            = ./                    # top dir
 certs       = $dir/certs
 crl_dir     = $dir/crl
 database       = $dir/index.txt        # index file.
 new_certs_dir  = $dir/newcerts         # new certs dir
 certificate    = $dir/certs/ca.crt    # The CA cert
 serial         = $dir/serial           # serial no file
 private_key    = $dir/private/cakey.pem# CA private key
 RANDFILE       = $dir/private/.rand    # random number file
 crl_dir        = $dir/crl
 default_days   = 365                   # how long to certify for
 default_crl_days= 30                   # how long before next CRL
 default_md     = md5                   # md to use
 policy         = policy_any            # default policy
 email_in_dn    = no                    # Don’t add the email into cert DN
 name_opt       = ca_default            # Subject name display option
 cert_opt       = ca_default            # Certificate display option
 copy_extensions = none                 # Don’t copy extensions from request
 [ policy_any ]
 countryName            = supplied
 stateOrProvinceName    = optional
 organizationName       = optional
 organizationalUnitName = optional
 commonName             = supplied
 emailAddress           = optional
9.      Tạo một certificate cho bản thân mình
[root@ca myCA]# cd /etc/pki/myCA
[root@ca myCA]# openssl req -new -x509 -keyout private/ca.key -out certs/ca.crt -days 1825
10.  Phân quyền để bảo mật khóa private
[root@ca tmp]# chmod 0400 /etc/pki/myCA/private/ca.key

Tạo một certificate request từ Web Server

1.      Kiểm tra bộ cài
[root@ web tmp]#rpm –q  openssl
2.      Tạo thư mục thử nghiệm và không sử dụng mục mặc định /etc/pki/
[root@web tmp]# mkdir -m 0755 /etc/pki
3.      Tạo thư mục để lưu CA
[root@ web tmp]#mkdir -m 0755 /etc/pki/myCA /etc/pki/myCA/private  /etc/pki/myCA/certs  /etc/pki/myCA/newcerts  /etc/pki/myCA/crl
4.      Tạo một certificate request:
[root@web myCA]#cd /etc/pki/myCA
[root@ web myCA]#openssl req -new -nodes -keyout private/server.key -out server.csr -days 365
Chú ý: Common Name (CN) là tên dịch vụ của bạn
5.      Giới hạn quyền truy cập file private
[root@web myCA]#chown root.apache /etc/pki /myCA/private/server.key
[root@webr myCA]#chmod 0440 /etc/pki/myCA/private/server.key
6.      Gửi chứng chỉ tới CA server
[root@web myCA]#scp  server.csr    [email protected]:/etc/pki/myCA/

Cấp phát chứng chỉ cho Web Server

1.      Chấp nhận một chứng chỉ
[root@ca   ~]# cd /etc/pki/myCA/
[root@ca myCA]# openssl ca –config testssl.conf  -out certs/server.crt -infiles server.csr
2.      Xóa certificate request
[root@ca myCA]# rm -f /etc/pki/myCA/server.csr
3.      Kiểm tra Certificate
[root@ca myCA]# openssl x509 -subject -issuer -enddate -noout -in /etc/pki /myCA/certs/server.crt
Hoặc
[root@ca myCA]# openssl x509 -in certs/server.crt -noout -text
4.      Kiểm tra chứng thực với chứng thực máy chủ CA
[root@ca myCA]#  openssl verify -purpose sslserver -CAfile /etc/pki/myCA/certs/ca.crt   /etc/pki/myCA/certs/server.crt
5.      Tạo mới một CRL (Certificate Revokation List):
# openssl ca -config testssl.conf -gencrl -out crl/myca.crl
6.      Gửi lại chứng chỉ cho máy chủ Web
[root@ca myCA]#  scp  /etc/pki/myCA/certs/server.crt     root@webserver:/etc/pki/myCA

Cấu hình Web server sử dụng Certificate

1.      Copy  certificate  và key tới vị trí để Apache có thể nhận biết
[root@server myCA]#mv /etc/httpd/conf/ssl.crt/server.crt /etc/httpd/conf/ssl.crt/server1.crt
[root@server myCA]#cp /etc/pki/myCA/server.crt  /etc/httpd/conf/ssl.crt/
[root@server myCA]#mv /etc/httpd/conf/ssl.key/server.key /etc/httpd/conf/ssl.key/server1.key
[root@server myCA]#cp /etc/pki/myCA/private/server.key /etc/httpd/conf/ssl.key/server.key
2.      Tạo trang web thử nghiệm
[root@server myCA]# cd /var/www/html/
[root@server html]# vi index.html
<html>
<header>
</header>
<body>
  This is a test
</body>
</html>
3.      Chạy máy chủ web
[root@server html]# chkconfig httpd on
[root@server html]#service httpd start

Cấu hình client sử dụng Certificate

Trong máy client chạy Internet Explorer tới địa chỉ:  http://web.lablinux.vn


   Trong máy client chạy Internet Explorer tới địa chỉ:  https://web.lablinux.vn


   Import Certificate của CA
a.       Chọn Option

Installing ProFTPD Server on RHEL/CentOS 7

 Linux  Comments Off on Installing ProFTPD Server on RHEL/CentOS 7
Sep 072015
 

ProFTPD is an Open Source FTP Server and one of the most used, secure and reliable file transfer daemons on Unix environments, due to its file configurations simplicity speed and easy setup.

Install Proftpd In CentOS 7

Install Proftpd In RHEL/CentOS 7

Requirements

  1. CentOS 7 Minimal Installation
  2. Red Hat Enterprise Linux 7 Installation
  3. Configure Static IP Address on System

This tutorial will guide you on how you can install and use ProFTPD Server on CentOS/RHEL 7 Linux distributions for a simple file transfer from your local system accounts to remote systems.

Step 1: Install Proftpd Server

1. Official RHEL/CentOS 7 repositories doesn’t provide any binary package for ProFTPD Server, so you need to add extra package repositories on your system provided by EPEL 7 Repo, using the following command.

# rpm -Uvh http://ftp.astral.ro/mirrors/fedora/pub/epel/beta/7/x86_64/epel-release-7-0.2.noarch.rpm
Install EPEL in CentOS 7

Install EPEL in RHEL/CentOS 7

2. Before you start installing ProFTPD Server, edit your machine hosts file, change it accordingly to your system FQDN and test the configurations to reflect your system domain naming.

# nano /etc/hosts

Here add your system FQDN on 127.0.0.1 localhost line like in the following example.

127.0.0.1 server.centos.lan localhost localhost.localdomain

Then edit /etc/hostname file to match the same system FQDN entry like in the screenshots below.

# nano /etc/hostname
Open Hostname File

Open Hostname File
Add Hostname in Hosts

Add Hostname in Hosts

3. After you have edited the host files, test your local DNS resolution using the following commands.

# hostname
# hostname -f     ## For FQDN
# hostname -s     ## For short name
How to Check Hostname in CentOS

Verify System Hostname

4. Now it’s time to install ProFTPD Server on your system and some required ftp utilities that we will be using later by issuing following command.

# yum install proftpd proftpd-utils
Install FTP in CentOS

Install Proftpd Server

5. After the server is installed, start and manage Proftpd daemon by issuing the following commands.

# systemctl start proftpd
# systemctl status proftpd
# systemctl stop proftpd
# systemctl restart proftpd
Start Proftpd Server

Start Proftpd Server

Step 2: Add Firewall Rules and Access Files

6. Now, your ProDTPD Server runs and listen for connections, but it’s not available for outside connections due to Firewall policy. To enable outside connections make sure you add a rule which opens port 21, using firewall-cmd system utility.

# firewall-cmd –add-service=ftp   ## On fly rule
# firewall-cmd –add-service=ftp   --permanent   ## Permanent rule
# systemctl restart firewalld.service
Open FTP Port in CentOS

Open Proftp Port in Firewall

7. The most simple way to access your FTP server from remote machines is by using a browser, redirecting to your server IP Address or domain name using ftp protocol on URL.

ftp://domain.tld

OR

ftp://ipaddress

8. The default configuration on Proftpd Server uses valid system local accounts credentials to login and access your account files which is your $HOME system path account, defined in /etc/passwd file.

Access Proftpd from Browser

Access Proftpd from Browser
Index of Proftpd Files

Index of Proftpd Files

9. To make ProFTPD Server automatically run after system reboot, aka enable it system-wide, issue the following command.

# systemctl enable proftpd

That’s it! Now you can access and manage your account files and folders using FTP protocol using whether a browser or other more advanced programs, such as FileZilla, which is available on almost any platforms, or WinSCP, an excellent File Transfer program that runs on Windows based systems.
On the next series of tutorials concerning ProFTPD Server on RHEL/CentOS 7, I shall discuss more advanced features like enabling Anonymous account, use TLS encrypted file transfers and adding Virtual Users.

OpenStack Kilo on Ubuntu 14.04.2 – Configure Cinder #1

 Virtualization  Comments Off on OpenStack Kilo on Ubuntu 14.04.2 – Configure Cinder #1
Sep 072015
 

OpenStack Logo

Cinder AKA OpenStack block storage service ads the persistent storage to an instance, it also provides an infrastructure for managing volumes and interacts with compute service to provide volume for instance. The amount of storage is provisioned and consumed is determined the block storage drivers, there are a variety of drivers that are available: NAS/SAN, NFS, iSCSI, Ceph, and more.

The block storage API and scheduler service typically runs on the controller nodes. Depending upon the drivers used, the volume service can run on controllers, compute nodes, or standalone storage nodes.

This guide helps you to install and configure cinder on the controller node. This service requires at least one additional storage node that provides volumes to instances.

Install and configure controller node:

Login into MySQL server as the root user.

# mysql -u root -p

Create the nova database.

CREATE DATABASE cinder;

Grant a proper permission to the nova database.

GRANT ALL PRIVILEGES ON cinder.* TO 'cinder'@'localhost' IDENTIFIED BY 'password';

GRANT ALL PRIVILEGES ON cinder.* TO 'cinder'@'%' IDENTIFIED BY 'password';

Replace “password” with a suitable password. Exit from MySQL.

Load your admin credential from the environment script.

# source admin-openrc.sh

Create the cinder user for creating service credentials.

# openstack user create --password-prompt cinder
User Password:
Repeat User Password:
+----------+----------------------------------+
| Field    | Value                            |
+----------+----------------------------------+
| email    | None                             |
| enabled  | True                             |
| id       | f02a9693b5dd4f328e8f1a292f372782 |
| name     | cinder                           |
| username | cinder                           |
+----------+----------------------------------+

Add the admin role to the cinder user.

# openstack role add --project service --user cinder admin
+-------+----------------------------------+
| Field | Value                            |
+-------+----------------------------------+
| id    | 33af4f957aa34cc79451c23bf014af6f |
| name  | admin                            |
+-------+----------------------------------+

Create the cinder service entities.

# openstack service create --name cinder --description "OpenStack Block Storage" volume
+-------------+----------------------------------+
| Field       | Value                            |
+-------------+----------------------------------+
| description | OpenStack Block Storage          |
| enabled     | True                             |
| id          | cc16bd02429842d694ccd4a425513cfc |
| name        | cinder                           |
| type        | volume                           |
+-------------+----------------------------------+
# openstack service create --name cinderv2 --description "OpenStack Block Storage" volumev2
+-------------+----------------------------------+
| Field       | Value                            |
+-------------+----------------------------------+
| description | OpenStack Block Storage          |
| enabled     | True                             |
| id          | 926e5dcb46654d228987d61978903b27 |
| name        | cinderv2                         |
| type        | volumev2                         |
+-------------+----------------------------------+

Create the Block Storage service API endpoints.

# openstack endpoint create --publicurl http://controller:8776/v2/%\(tenant_id\)s --internalurl http://controller:8776/v2/%\(tenant_id\)s --adminurl http://controller:8776/v2/%\(tenant_id\)s --region RegionOne volume

+--------------+-----------------------------------------+
| Field        | Value                                   |
+--------------+-----------------------------------------+
| adminurl     | http://controller:8776/v2/%(tenant_id)s |
| id           | 4b38b10d227a48cfaf1d6356d23a6481        |
| internalurl  | http://controller:8776/v2/%(tenant_id)s |
| publicurl    | http://controller:8776/v2/%(tenant_id)s |
| region       | RegionOne                               |
| service_id   | cc16bd02429842d694ccd4a425513cfc        |
| service_name | cinder                                  |
| service_type | volume                                  |
+--------------+-----------------------------------------+
# openstack endpoint create --publicurl http://controller:8776/v2/%\(tenant_id\)s --internalurl http://controller:8776/v2/%\(tenant_id\)s --adminurl http://controller:8776/v2/%\(tenant_id\)s --region RegionOne volumev2

+--------------+-----------------------------------------+
| Field        | Value                                   |
+--------------+-----------------------------------------+
| adminurl     | http://controller:8776/v2/%(tenant_id)s |
| id           | dcf45538165b40f2a6736bcf5276b319        |
| internalurl  | http://controller:8776/v2/%(tenant_id)s |
| publicurl    | http://controller:8776/v2/%(tenant_id)s |
| region       | RegionOne                               |
| service_id   | 926e5dcb46654d228987d61978903b27        |
| service_name | cinderv2                                |
| service_type | volumev2                                |
+--------------+-----------------------------------------+

Install and configure Cinder (Block Storage) controller components:

Install the following packages on the controller node.

# apt-get install cinder-api cinder-scheduler python-cinderclient

Edit the /etc/cinder/cinder.conf file.

# nano /etc/cinder/cinder.conf

Modify the below settings and make sure to place an entries in the proper sections. Some time you may need to add sections if it does not exists and also you require to add some entries which are missing in the file, not all.

[database]
connection = mysql://cinder:password@controller/cinder

## Replace "password" with the password you chose for cinder database

[DEFAULT]
...
rpc_backend = rabbit
auth_strategy = keystone
verbose = True
my_ip = 192.168.12.21

## Management IP of Controller Node

[oslo_messaging_rabbit]
rabbit_host = controller
rabbit_userid = openstack
rabbit_password = password

## Replace "password" with the password you chose for the openstack account in RabbitMQ.

[keystone_authtoken]
auth_uri = http://controller:5000
auth_url = http://controller:35357
auth_plugin = password
project_domain_id = default
user_domain_id = default
project_name = service
username = cinder
password = password

## Replace "password" with the password you chose for cinder user in the identity service
## Comment out or remove any other options in the [keystone_authtoken] section

[oslo_concurrency]
lock_path = /var/lock/cinder

## Comment out the lock_path in (DEFAULT) section.

Populate the cinder database.

# su -s /bin/sh -c "cinder-manage db sync" cinder

Restart the services.

# service cinder-scheduler restart
# service cinder-api restart

Remove the SQLite database file.

# rm -f /var/lib/cinder/cinder.sqlite

List the services, you can ignore the warnings.

# cinder-manage service list

Binary           Host                                 Zone             Status     State Updated At
cinder-scheduler controller                           nova             enabled    :-)   2015-07-06 18:35:55

That’s All!!. Next is to configure a Storage Node.

OpenStack Kilo on Ubuntu 14.04.2 – Configure Horizon

 Virtualization  Comments Off on OpenStack Kilo on Ubuntu 14.04.2 – Configure Horizon
Sep 072015
 

OpenStack Logo

In the last tutorial, we have had created an instance using CLI; same can be done through a web interface called Horizon. It enables us to manage various OpenStack resources and services. This guide helps you to configure horizon in Ubuntu 14.04.

Horizon uses OpenStack API’s to interact with the cloud controller, you can also customize the dashboard for branding. Here we will be using apache servers as web server to serve horizon dashboard.

System requirements:

Before proceeding ahead, make sure your system meets below requirements.

OpenStack compute installation, it enables identity service for user and project management.

Dashboard should be run as identity service user with sudo privileges.

Python version should support Django, v 2.7.

Install and configure dashboard on a node that can contact the identity service.

Install the Horizon components:

Install the following OpenStack dashboard package on the controller node.

# apt-get install openstack-dashboard

Configure the Horizon:

Edit the /etc/openstack-dashboard/local_settings.py file.

# nano /etc/openstack-dashboard/local_settings.py

Modify below settings.

## Enter controller node details.

OPENSTACK_HOST = "controller"

## Allow hosts to access dashboard

ALLOWED_HOSTS = '*'

## Comment out any other storage configuration.

CACHES = {
'default': {
'BACKEND': 'django.core.cache.backends.memcached.MemcachedCache',
'LOCATION': '127.0.0.1:11211',
}
}

## Default role that will assigned when the user is created via dashboard.

OPENSTACK_KEYSTONE_DEFAULT_ROLE = "user"

## Replace TIME_ZONE with your Time zone.

TIME_ZONE = "TIME_ZONE"

Restart the apache service.

# service apache2 restart

Access the dashboard using the following url

http://controller/horizon or http://ip-add-ress/horizon

Enter the admin credential that we created during Keystone configurations.

OpenStack - Configure Horizon
OpenStack – Configure Horizon

Once you logged in, you will be taken to summary page of Horizon.

OpenStack - Configure Horizon (Usage Summary)
OpenStack – Configure Horizon (Usage Summary)

Click on Instances section on the left side to list down the instances.

OpenStack - Configure Horizon (Instances)
OpenStack – Configure Horizon (Instances)

Click on the Instance name to get further information.

OpenStack - Configure Horizon (Instance Overview)
OpenStack – Configure Horizon (Instance Overview)

You can click on the console menu to get the remote console of the selected instance.

OpenStack - Configure Horizon (Instance Console)
OpenStack – Configure Horizon (Instance Console)

You may need to make a host entry of controller on client desktop from where you are accessing the dashboard.

That’s All!!!, you have successfully configured Horizon. Next is to configure Block Storage Server (Cinder).

OpenStack Kilo on Ubuntu 14.04.2 – Launch an instance

 Virtualization  Comments Off on OpenStack Kilo on Ubuntu 14.04.2 – Launch an instance
Sep 072015
 

OpenStack Logo

This guide shows you how to launch an instance of Fedora 22 image that we added in OpenStack Kilo on Ubuntu 14.04.2 – Glance. Here we will be using command line interface on the controller node to create an instance, this tutorial launches an instance using OpenStack Networking (neutron).

Load the admin credentials on the controller node.

# source demo-openrc.sh

Almost all cloud images uses public keys for authentication instead of user/password authentication. Before launching an instance, we must create a public/private key pair.

Generate and add a key pair.

# nova keypair-add my-key

Copy the output of above command and save it into any file, this key should be used with ssh command to login to instance.

List the available key pair’s.

# nova keypair-list
+--------+-------------------------------------------------+
| Name   | Fingerprint                                     |
+--------+-------------------------------------------------+
| my-key | 0a:b2:30:cb:54:fc:c4:69:29:00:19:ef:38:8d:2e:2d |
+--------+-------------------------------------------------+

Launch an instance:

To launch an instance, we must need to know flavors, available images, networks, and security groups.

List the available flavors, this is nothing but a predefined allocation of cpu, memory and disk.

# nova flavor-list
+----+-----------+-----------+------+-----------+------+-------+-------------+-----------+
| ID | Name      | Memory_MB | Disk | Ephemeral | Swap | VCPUs | RXTX_Factor | Is_Public |
+----+-----------+-----------+------+-----------+------+-------+-------------+-----------+
| 1  | m1.tiny   | 512       | 1    | 0         |      | 1     | 1.0         | True      |
| 2  | m1.small  | 2048      | 20   | 0         |      | 1     | 1.0         | True      |
| 3  | m1.medium | 4096      | 40   | 0         |      | 2     | 1.0         | True      |
| 4  | m1.large  | 8192      | 80   | 0         |      | 4     | 1.0         | True      |
| 5  | m1.xlarge | 16384     | 160  | 0         |      | 8     | 1.0         | True      |
+----+-----------+-----------+------+-----------+------+-------+-------------+-----------+

List available images.

# nova image-list
+--------------------------------------+--------------------------------------+--------+--------+
| ID                                   | Name                                 | Status | Server |
+--------------------------------------+--------------------------------------+--------+--------+
| a1533d87-d6fa-4d9d-bf85-6b2ab8400712 | Fedora-Cloud-Base-22-20150521.x86_64 | ACTIVE |        |
+--------------------------------------+--------------------------------------+--------+--------+

List available networks. Our instance will use int-net (Internal network), while creating the instance we must specify network using the ID instead of name.

# neutron net-list
+--------------------------------------+---------+-------------------------------------------------------+
| id                                   | name    | subnets                                               |
+--------------------------------------+---------+-------------------------------------------------------+
| 187a7b6c-7d14-4d8f-8673-57fa9bab1bba | int-net | 7f75b54f-7b87-42e4-a7e1-f452c8adcb3a 192.168.100.0/24 |
| db407537-7951-411c-ab8e-ef59d204f110 | ext-net | a517e200-38eb-4b4b-b82f-d486e07756ca 192.168.0.0/24   |
+--------------------------------------+---------+-------------------------------------------------------+

List available security groups.

# nova secgroup-list
+--------------------------------------+---------+------------------------+
| Id                                   | Name    | Description            |
+--------------------------------------+---------+------------------------+
| c88f4002-611e-41dd-af7c-2f7c348dea27 | default | Default security group |
+--------------------------------------+---------+------------------------+

Default security group implements a firewall that blocks remote access to instance, to allow remote access to instance, we need to configure remote access.

The following commands adds rule to default security group, to allow ping and SSH access.

# nova secgroup-add-rule default icmp -1 -1 0.0.0.0/0
+-------------+-----------+---------+-----------+--------------+
| IP Protocol | From Port | To Port | IP Range  | Source Group |
+-------------+-----------+---------+-----------+--------------+
| icmp        | -1        | -1      | 0.0.0.0/0 |              |
+-------------+-----------+---------+-----------+--------------+

# nova secgroup-add-rule default tcp 22 22 0.0.0.0/0
+-------------+-----------+---------+-----------+--------------+
| IP Protocol | From Port | To Port | IP Range  | Source Group |
+-------------+-----------+---------+-----------+--------------+
| tcp         | 22        | 22      | 0.0.0.0/0 |              |
+-------------+-----------+---------+-----------+--------------+

Launch the first instance using the below command, load a variable for network ID.

# INT_NET_ID=`neutron net-list | grep int-net | awk '{ print $2 }'

Replace $INT_NET_ID with ID of internal network.

# nova boot --flavor m1.small --image Fedora-Cloud-Base-22-20150521.x86_64 --nic net-id=$INT_NET_ID --security-group default --key-name my-key MY-Fedora
+--------------------------------------+-----------------------------------------------------------------------------+
| Property                             | Value                                                                       |
+--------------------------------------+-----------------------------------------------------------------------------+
| OS-DCF:diskConfig                    | MANUAL                                                                      |
| OS-EXT-AZ:availability_zone          | nova                                                                        |
| OS-EXT-SRV-ATTR:host                 | -                                                                           |
| OS-EXT-SRV-ATTR:hypervisor_hostname  | -                                                                           |
| OS-EXT-SRV-ATTR:instance_name        | instance-0000000b                                                           |
| OS-EXT-STS:power_state               | 0                                                                           |
| OS-EXT-STS:task_state                | scheduling                                                                  |
| OS-EXT-STS:vm_state                  | building                                                                    |
| OS-SRV-USG:launched_at               | -                                                                           |
| OS-SRV-USG:terminated_at             | -                                                                           |
| accessIPv4                           |                                                                             |
| accessIPv6                           |                                                                             |
| adminPass                            | 7PGDvZaxnxR5                                                                |
| config_drive                         |                                                                             |
| created                              | 2015-07-02T17:45:15Z                                                        |
| flavor                               | m1.small (2)                                                                |
| hostId                               |                                                                             |
| id                                   | 7432030a-3cbe-49c6-956a-3e725e22196d                                        |
| image                                | Fedora-Cloud-Base-22-20150521.x86_64 (a1533d87-d6fa-4d9d-bf85-6b2ab8400712) |
| key_name                             | my-key                                                                      |
| metadata                             | {}                                                                          |
| name                                 | MY-Fedora                                                                   |
| os-extended-volumes:volumes_attached | []                                                                          |
| progress                             | 0                                                                           |
| security_groups                      | default                                                                     |
| status                               | BUILD                                                                       |
| tenant_id                            | 9b05e6bffdb94c8081d665561d05e31e                                            |
| updated                              | 2015-07-02T17:45:15Z                                                        |
| user_id                              | 127a9a6b822a4e3eba69fa54128873cd                                            |
+--------------------------------------+-----------------------------------------------------------------------------+

We will check the status of our instance.

# nova list
+--------------------------------------+-----------+--------+------------+-------------+-----------------------+
| ID                                   | Name      | Status | Task State | Power State | Networks              |
+--------------------------------------+-----------+--------+------------+-------------+-----------------------+
| 7432030a-3cbe-49c6-956a-3e725e22196d | MY-Fedora | ACTIVE | -          | Running     | int-net=192.168.100.8 |
+--------------------------------------+-----------+--------+------------+-------------+-----------------------+

Create a floating IP address on the external network (ext-net).

# neutron floatingip-create ext-net
Created a new floatingip:
+---------------------+--------------------------------------+
| Field               | Value                                |
+---------------------+--------------------------------------+
| fixed_ip_address    |                                      |
| floating_ip_address | 192.168.0.201                        |
| floating_network_id | db407537-7951-411c-ab8e-ef59d204f110 |
| id                  | 0be060c7-d84f-4691-8205-34ad9bb6a296 |
| port_id             |                                      |
| router_id           |                                      |
| status              | DOWN                                 |
| tenant_id           | 9b05e6bffdb94c8081d665561d05e31e     |
+---------------------+--------------------------------------+

We will associate the floating IP address to our instance (MY-Fedora).

# nova floating-ip-associate MY-Fedora 192.168.0.201

Check the status of the floating IP address.

# nova list
+--------------------------------------+-----------+--------+------------+-------------+--------------------------------------+
| ID                                   | Name      | Status | Task State | Power State | Networks                             |
+--------------------------------------+-----------+--------+------------+-------------+--------------------------------------+
| 7432030a-3cbe-49c6-956a-3e725e22196d | MY-Fedora | ACTIVE | -          | Running     | int-net=192.168.100.8, 192.168.0.201 |
+--------------------------------------+-----------+--------+------------+-------------+--------------------------------------+

Verify the network connectivity using ping from any host on the external physical network.

C:\>ping 192.168.0.201

Pinging 192.168.0.201 with 32 bytes of data:
Reply from 192.168.0.201: bytes=32 time=1ms TTL=63
Reply from 192.168.0.201: bytes=32 time=2ms TTL=63
Reply from 192.168.0.201: bytes=32 time=1ms TTL=63

Ping statistics for 192.168.0.201:
Packets: Sent = 4, Received = 4, Lost = 0 (0% loss),
Approximate round trip times in milli-seconds:
Minimum = 1ms, Maximum = 2ms, Average = 1ms

Once you get a ping response, wait atleast a minute, allow the instance to get fully booted; then try to SSH from controller or external system. Use the key pair for authentication.

# ssh -i mykey [email protected]

The authenticity of host '192.168.0.201 (192.168.0.201)' can't be established.
ECDSA key fingerprint is 0e:c2:58:9b:7f:28:10:a9:e1:cf:6d:00:51:6b:1f:f5.
Are you sure you want to continue connecting (yes/no)? yes
Warning: Permanently added '192.168.0.201' (ECDSA) to the list of known hosts.
[fedora@my-fedora ~]$

Now you have successfully logged into fedora instance.

OpenStack Kilo on Ubuntu 14.04.2 – Create initial networks

 Virtualization  Comments Off on OpenStack Kilo on Ubuntu 14.04.2 – Create initial networks
Sep 072015
 

OpenStack Logo

This is the fourth part of configuring neutron (Networking) on Ubuntu 14.04, you can go through previous article on Configure Neutron #1 , Configure Neutron #2, and Configure Neutron #3 in which we have installed and configured Networking components on Controller, Network, and Compute node.

Here, we will be creating initial network, this must be created before launching VM instance.

OpenStack  Networking (Neutron) - With Subnets
OpenStack Networking (Neutron) – With Subnets

Creating external Network:

The external network provides internet access to instances using NAT (Network Address Translation), internet access can be enabled to individual instances using a floating ip address with the suitable security rules.

Load credentials on controller node.

# source admin-openrc.sh

create the network.

# neutron net-create ext-net --router:external --provider:physical_network external --provider:network_type flat

Created a new network:
+---------------------------+--------------------------------------+
| Field                     | Value                                |
+---------------------------+--------------------------------------+
| admin_state_up            | True                                 |
| id                        | b4c8d5fc-a4b9-42dc-b705-48c0d4217137 |
| mtu                       | 0                                    |
| name                      | ext-net                              |
| provider:network_type     | flat                                 |
| provider:physical_network | external                             |
| provider:segmentation_id  |                                      |
| router:external           | True                                 |
| shared                    | False                                |
| status                    | ACTIVE                               |
| subnets                   |                                      |
| tenant_id                 | 9b05e6bffdb94c8081d665561d05e31e     |
+---------------------------+--------------------------------------+

Create a subnet on the external network.

For example, using 192.168.0.0/24 with floating IP address range 192.168.0.200 to 203.0.113.250 with the physical gateway 192.168.0.1. This gateway should be associated physical network

# neutron subnet-create ext-net 192.168.0.0/24 --name ext-subnet --allocation-pool start=192.168.0.200,end=192.168.0.250 --disable-dhcp --gateway 192.168.0.1
Created a new subnet:
+-------------------+----------------------------------------------------+
| Field             | Value                                              |
+-------------------+----------------------------------------------------+
| allocation_pools  | {"start": "192.168.0.200", "end": "192.168.0.250"} |
| cidr              | 192.168.0.0/24                                     |
| dns_nameservers   |                                                    |
| enable_dhcp       | False                                              |
| gateway_ip        | 192.168.0.1                                        |
| host_routes       |                                                    |
| id                | b32eb748-9bc0-4e57-ae26-cd17033b635e               |
| ip_version        | 4                                                  |
| ipv6_address_mode |                                                    |
| ipv6_ra_mode      |                                                    |
| name              | ext-subnet                                         |
| network_id        | b4c8d5fc-a4b9-42dc-b705-48c0d4217137               |
| subnetpool_id     |                                                    |
| tenant_id         | 9b05e6bffdb94c8081d665561d05e31e                   |
+-------------------+----------------------------------------------------+

Creating internal network:

The internal network provides internal network access for instances, internal networks are isolated from each other. Only the instance running on same network can communicate each other, not to or from other networks.

Create the internal network (int-net).

# neutron net-create int-net
Created a new network:
+---------------------------+--------------------------------------+
| Field                     | Value                                |
+---------------------------+--------------------------------------+
| admin_state_up            | True                                 |
| id                        | 187a7b6c-7d14-4d8f-8673-57fa9bab1bba |
| mtu                       | 0                                    |
| name                      | int-net                              |
| provider:network_type     | gre                                  |
| provider:physical_network |                                      |
| provider:segmentation_id  | 1                                    |
| router:external           | False                                |
| shared                    | False                                |
| status                    | ACTIVE                               |
| subnets                   |                                      |
| tenant_id                 | 9b05e6bffdb94c8081d665561d05e31e     |
+---------------------------+--------------------------------------+

Create a subnet on the internal network. For example, using 192.168.100.0/24 network with the virtual gateway 192.168.0.1

# neutron subnet-create int-net 192.168.100.0/24 --name int-subnet --gateway 192.168.100.1
Created a new subnet:
+-------------------+------------------------------------------------------+
| Field             | Value                                                |
+-------------------+------------------------------------------------------+
| allocation_pools  | {"start": "192.168.100.2", "end": "192.168.100.254"} |
| cidr              | 192.168.100.0/24                                     |
| dns_nameservers   |                                                      |
| enable_dhcp       | True                                                 |
| gateway_ip        | 192.168.100.1                                        |
| host_routes       |                                                      |
| id                | 7f75b54f-7b87-42e4-a7e1-f452c8adcb3a                 |
| ip_version        | 4                                                    |
| ipv6_address_mode |                                                      |
| ipv6_ra_mode      |                                                      |
| name              | int-subnet                                           |
| network_id        | 187a7b6c-7d14-4d8f-8673-57fa9bab1bba                 |
| subnetpool_id     |                                                      |
| tenant_id         | 9b05e6bffdb94c8081d665561d05e31e                     |
+-------------------+------------------------------------------------------+

Create the virtual router.

A virtual router passes network traffic between two or more virtual networks, In our case, we need to create a router and attach internal and external networks to it.

# neutron router-create int-router
Created a new router:
+-----------------------+--------------------------------------+
| Field                 | Value                                |
+-----------------------+--------------------------------------+
| admin_state_up        | True                                 |
| distributed           | False                                |
| external_gateway_info |                                      |
| ha                    | False                                |
| id                    | a47b81d7-2ad8-4bdc-a17a-0026ad374dcf |
| name                  | int-router                           |
| routes                |                                      |
| status                | ACTIVE                               |
| tenant_id             | 9b05e6bffdb94c8081d665561d05e31e     |
+-----------------------+--------------------------------------+

Attach the router to the internal subnet.

# neutron router-interface-add int-router int-subnet
Added interface cb36eb61-5e3a-4c85-b747-8e230b5d1fec to router int-router.

Attach the router to the external network by setting it as the gateway.

# neutron router-gateway-set int-router ext-net
Set gateway for router int-router

You can verify the connectivity by pinging 192.168.0.200 from the external physical network. This is because we used subnet 192.168.0.0/24, floating ip ranges from 192.168.0.200 – 250, tenant router gateway should occupy the lowest IP address in the floating IP address range ie 192.168.0.200

C:\>ping 192.168.0.200

Pinging 192.168.0.200 with 32 bytes of data:
Reply from 192.168.0.200: bytes=32 time<1ms TTL=64
Reply from 192.168.0.200: bytes=32 time=1ms TTL=64

Ping statistics for 192.168.0.200:
Packets: Sent = 4, Received = 4, Lost = 0 (0% loss),
Approximate round trip times in milli-seconds:
Minimum = 0ms, Maximum = 1ms, Average = 0ms

That’s All!!!, you have successfully configured Networking (Neutron). You are good to go for launching an instance.

OpenStack Kilo on Ubuntu 14.04.2 – Configure Neutron #3

 Virtualization  Comments Off on OpenStack Kilo on Ubuntu 14.04.2 – Configure Neutron #3
Sep 072015
 

OpenStack Logo

This is the third part of configuring neutron (Networking) on Ubuntu 14.04, you can go through previous article on Configure Neutron #1 and Configure Neutron #2 in which we have installed and configured Networking components on Controller node and Network Node.

Here, we will be configuring compute node to use neutron.

Prerequisites:

Configure kernel parameters on compute node, edit /etc/sysctl.conf file.

# nano /etc/sysctl.conf

Add the following parameters into the file.

net.ipv4.conf.all.rp_filter=0
net.ipv4.conf.default.rp_filter=0
net.bridge.bridge-nf-call-iptables=1
net.bridge.bridge-nf-call-ip6tables=1

Apply the changes.

# sysctl -p

Install and configure Networking components:

Install the following packages on each and every compute node you have it on OpenStack environment.

# apt-get install neutron-plugin-ml2 neutron-plugin-openvswitch-agent

Edit the /etc/neutron/neutron.conf file.

# nano /etc/neutron/neutron.conf

Modify the below settings and make sure to place a entries in the proper sections. In the case of database section, comment out any connection options as network node does not directly access the database.

[DEFAULT]
...
rpc_backend = rabbit
verbose = True
core_plugin = ml2
service_plugins = router
allow_overlapping_ips = True
auth_strategy = keystone

[database]
...
#connection = sqlite:////var/lib/neutron/neutron.sqlite

##Comment out the above line.

[oslo_messaging_rabbit]
...
rabbit_host = controller
rabbit_userid = openstack
rabbit_password = password

## Replace "password" with the password you chose for the openstack account in RabbitMQ

[keystone_authtoken]
...
auth_uri = http://controller:5000
auth_url = http://controller:35357
auth_plugin = password
project_domain_id = default
user_domain_id = default
project_name = service
username = neutron
password = password

## Replace "password" with the password you chose for neutron user in the identity service

Configure Modular Layer 2 (ML2) plug-in:

Edit the /etc/neutron/plugins/ml2/ml2_conf.ini file.

# nano /etc/neutron/plugins/ml2/ml2_conf.ini

Modify the below sections.

[ml2]
...
type_drivers = flat,vlan,gre,vxlan
tenant_network_types = gre
mechanism_drivers = openvswitch

[ml2_type_gre]
...
tunnel_id_ranges = 1:1000

[securitygroup]
...
enable_security_group = True
enable_ipset = True
firewall_driver = neutron.agent.linux.iptables_firewall.OVSHybridIptablesFirewallDriver

[ovs]
local_ip = 192.168.12.23

## Tunnel network interface on your Compute Node.

[agent]
tunnel_types = gre

## [ovs] and [agent] stanzas are need to be added extra at the bottom of the file.

Restart the Open vSwitch service.

# service openvswitch-switch restart

Configure Compute node to use Networking:

By default, Compute node uses legacy networking. We must reconfigure Compute to manage networks through Neutron.

Edit the /etc/nova/nova.conf file.

# nano /etc/nova/nova.conf

Modify the below settings and make sure to place a entries in the proper sections. If the sections does not exists, create a sections accordingly.

[DEFAULT]
...
network_api_class = nova.network.neutronv2.api.API
security_group_api = neutron
linuxnet_interface_driver = nova.network.linux_net.LinuxOVSInterfaceDriver
firewall_driver = nova.virt.firewall.NoopFirewallDriver

[neutron]

url = http://controller:9696
auth_strategy = keystone
admin_auth_url = http://controller:35357/v2.0
admin_tenant_name = service
admin_username = neutron
admin_password = password

## Replace "password" with the password you chose for neutron user in the identity service

Restart the compute and Open vSwitch agen on compute node.

# service nova-compute restart
# service neutron-plugin-openvswitch-agent restart

Verify operation:

Load admin credentials on the controller node.

# source admin-openrc.sh

List the agents.

# neutron agent-list
+--------------------------------------+--------------------+---------+-------+----------------+---------------------------+
| id                                   | agent_type         | host    | alive | admin_state_up | binary                    |
+--------------------------------------+--------------------+---------+-------+----------------+---------------------------+
| 23da3f95-b81b-4426-9d7a-d5cbfc5241c0 | Metadata agent     | network | :-)   | True           | neutron-metadata-agent    |
| 4217b0c0-fbd4-47d9-bc22-5187f09d958a | DHCP agent         | network | :-)   | True           | neutron-dhcp-agent        |
| a4eaabf8-8cf0-4d72-817d-d80921b4f915 | Open vSwitch agent | compute | :-)   | True           | neutron-openvswitch-agent |
| b4cf95cd-2eba-4c69-baa6-ae8832384e40 | Open vSwitch agent | network | :-)   | True           | neutron-openvswitch-agent |
| d9e174be-e719-4f05-ad05-bc444eb97df5 | L3 agent           | network | :-)   | True           | neutron-l3-agent          |
+--------------------------------------+--------------------+---------+-------+----------------+---------------------------+

The output should have four agents alive on the network node and one agent alive on the compute node.

OpenStack Kilo on Ubuntu 14.04.2 – Configure Neutron #2

 Virtualization  Comments Off on OpenStack Kilo on Ubuntu 14.04.2 – Configure Neutron #2
Sep 072015
 

OpenStack Logo

This is the second part of configuring neutron (Networking) on Ubuntu 14.04, you can go through previous article on Configure Neutron #1, in which we have installed and configured Networking components on Controller node.

Here, in this tutorial we will install and configure Network Node.

Prerequisite:

Make sure you have enabled OpenStack Kilo repository on Compute Node, or follow below steps to enable it.

Install the Ubuntu Cloud archive keyring and repository.

# apt-get install ubuntu-cloud-keyring

# echo "deb http://ubuntu-cloud.archive.canonical.com/ubuntu" "trusty-updates/kilo main" > /etc/apt/sources.list.d/cloudarchive-kilo.list

Upgrade your system.

# apt-get update

Configure kernel parameters on network node, edit /etc/sysctl.conf file.

# nano /etc/sysctl.conf

Add the following parameters into the file.

net.ipv4.ip_forward=1
net.ipv4.conf.all.rp_filter=0
net.ipv4.conf.default.rp_filter=0

Apply the changes.

# sysctl -p

Install and configure Networking components:

Install the following packages on Network node.

# apt-get install neutron-plugin-ml2 neutron-plugin-openvswitch-agent neutron-l3-agent neutron-dhcp-agent neutron-metadata-agent

Edit /etc/neutron/neutron.conf.

# nano /etc/neutron/neutron.conf

Modify the below settings and make sure to place a entries in the proper sections. In the case of database section, comment out any connection options as network node does not directly access the database

[DEFAULT]
...
rpc_backend = rabbit
core_plugin = ml2
service_plugins = router
allow_overlapping_ips = True
auth_strategy = keystone
verbose = True

[oslo_messaging_rabbit]
...
rabbit_host = controller
rabbit_userid = openstack
rabbit_password = password

## Replace "password" with the password you chose for the openstack account in RabbitMQ

[database]
...
#connection = sqlite:////var/lib/neutron/neutron.sqlite

##Comment out the above line.

[keystone_authtoken]
...
auth_uri = http://controller:5000
auth_url = http://controller:35357
auth_plugin = password
project_domain_id = default
user_domain_id = default
project_name = service
username = neutron
password = password

## Replace "password" with the password you chose for neutron user in the identity service

Configure Modular Layer 2 (ML2) plug-in:

Edit the /etc/neutron/plugins/ml2/ml2_conf.ini file.

# nano /etc/neutron/plugins/ml2/ml2_conf.ini

Modify the below sections.

[ml2]
...
type_drivers = flat,vlan,gre,vxlan
tenant_network_types = gre
mechanism_drivers = openvswitch

[ml2_type_flat]
...
flat_networks = external

[ml2_type_gre]
...
tunnel_id_ranges = 1:1000

[securitygroup]
...
enable_security_group = True
enable_ipset = True
firewall_driver = neutron.agent.linux.iptables_firewall.OVSHybridIptablesFirewallDriver

[ovs]
local_ip = 192.168.11.22
## Tunnel network interface on your Network Node.
bridge_mappings = external:br-ex

[agent]
tunnel_types = gre

Note: [ovs] and [agent] stanzas are need to be added extra at the bottom of the file.

Configure the Layer-3 (L3) agent:

It provides routing services for virtual networks, Edit the /etc/neutron/l3_agent.ini file.

# nano /etc/neutron/l3_agent.ini

Modify the [DEFAULT] section.

[DEFAULT]
...
interface_driver = neutron.agent.linux.interface.OVSInterfaceDriver
external_network_bridge =
router_delete_namespaces = True
verbose = True

Configure the DHCP agent:

Edit the /etc/neutron/dhcp_agent.ini file.

# nano  /etc/neutron/dhcp_agent.ini

Modify the following stanzas.

[DEFAULT]
...
interface_driver = neutron.agent.linux.interface.OVSInterfaceDriver
dhcp_driver = neutron.agent.linux.dhcp.Dnsmasq
dhcp_delete_namespaces = True
verbose = True

Configure the metadata agent:

Edit the /etc/neutron/metadata_agent.ini file

# nano /etc/neutron/metadata_agent.ini

Modify the following sections, you may have to comment out the existing entries.

[DEFAULT]
...
verbose = True
auth_uri = http://controller:5000
auth_url = http://controller:35357
auth_region = RegionOne
auth_plugin = password
project_domain_id = default
user_domain_id = default
project_name = service
username = neutron
password = password

## Replace "password" with the password you chose for neutron user in the identity service.

nova_metadata_ip = controller
metadata_proxy_shared_secret = 26f008fb8c504b393df3
## Replace "26f008fb8c504b393df3" with a suitable secret for the metadata proxy

On the Controller node, edit the /etc/nova/nova.conf file.

# nano /etc/nova/nova.conf

Modify the [neutron] sections.

[neutron]
...
service_metadata_proxy = True
metadata_proxy_shared_secret = 26f008fb8c504b393df3

## Replace "26f008fb8c504b393df3" with the secret you chose for the metadata proxy.

Restart the compute API service on controller node.

# service nova-api restart

Configure the Open vSwitch (OVS) service:

Restart the OVS service on Network Node.

# service openvswitch-switch restart

Add the external bridge.

# ovs-vsctl add-br br-ex

Add a port to the external bridge that connects to the physical external network interface, in my case eth2 is the interface name.

# ovs-vsctl add-port br-ex eth2

Restar the networking services.

# service neutron-plugin-openvswitch-agent restart
# service neutron-l3-agent restart
# service neutron-dhcp-agent restart
# service neutron-metadata-agent restart

Verify operation:

Load admin credentials on the controller node.

# source admin-openrc.sh

List the agents.

# neutron agent-list
+--------------------------------------+--------------------+---------+-------+----------------+---------------------------+
| id                                   | agent_type         | host    | alive | admin_state_up | binary                    |
+--------------------------------------+--------------------+---------+-------+----------------+---------------------------+
| 23da3f95-b81b-4426-9d7a-d5cbfc5241c0 | Metadata agent     | network | :-)   | True           | neutron-metadata-agent    |
| 4217b0c0-fbd4-47d9-bc22-5187f09d958a | DHCP agent         | network | :-)   | True           | neutron-dhcp-agent        |
| b4cf95cd-2eba-4c69-baa6-ae8832384e40 | Open vSwitch agent | network | :-)   | True           | neutron-openvswitch-agent |
| d9e174be-e719-4f05-ad05-bc444eb97df5 | L3 agent           | network | :-)   | True           | neutron-l3-agent          |
+--------------------------------------+--------------------+---------+-------+----------------+---------------------------+

That’s All!!!, you have successfully configured Network Node.

OpenStack Kilo on Ubuntu 14.04.2 – Configure Neutron #1

 Virtualization  Comments Off on OpenStack Kilo on Ubuntu 14.04.2 – Configure Neutron #1
Sep 072015
 

OpenStack Logo

OpenStack Networking allows you to create or attach interface device to networks, this guide helps you to configure Neutron (Networking) on OpenStack environment. Neutron manages all networking related things that are required for Virtual Networking Infrastructure, it provides the networks, subnets, and router object abstractions.

Install and configure controller node:

Before we configure Neutron service, we must create a database, service, and API endpoint.

Login as the root into MySQL server.

# mysql -u root -p
Create the neutron database.
CREATE DATABASE neutron;

Grant a proper permission to the neutron database.

GRANT ALL PRIVILEGES ON neutron.* TO 'neutron'@'localhost' IDENTIFIED BY 'password';

GRANT ALL PRIVILEGES ON neutron.* TO 'neutron'@'%' IDENTIFIED BY 'password';

Replace “password” with a suitable password. Exit from MySQL.

Load your admin credential from the environment script.

# source admin-openrc.sh

Create the neutron user for creating service credentials.

# openstack user create --password-prompt neutron
User Password:
Repeat User Password:
+----------+----------------------------------+
| Field    | Value                            |
+----------+----------------------------------+
| email    | None                             |
| enabled  | True                             |
| id       | ac5ee3286887450d911b82d4e263e1c9 |
| name     | neutron                          |
| username | neutron                          |
+----------+----------------------------------+

Add the admin role to the neutron user.

# openstack role add --project service --user neutron admin
+-------+----------------------------------+
| Field | Value                            |
+-------+----------------------------------+
| id    | 33af4f957aa34cc79451c23bf014af6f |
| name  | admin                            |
+-------+----------------------------------+

Create the neutron service entity.

# openstack service create --name neutron --description "OpenStack Networking" network
+-------------+----------------------------------+
| Field       | Value                            |
+-------------+----------------------------------+
| description | OpenStack Networking             |
| enabled     | True                             |
| id          | 95237876259e44d9a1a926577b786875 |
| name        | neutron                          |
| type        | network                          |
+-------------+----------------------------------+

Create the neutron service API endpoint.

# openstack endpoint create \
--publicurl http://controller:9696 \
--adminurl http://controller:9696 \
--internalurl http://controller:9696 \
--region RegionOne \
network
+--------------+----------------------------------+
| Field        | Value                            |
+--------------+----------------------------------+
| adminurl     | http://controller:9696           |
| id           | ed46eb46c27e4f2b9a58ff574f43d0cb |
| internalurl  | http://controller:9696           |
| publicurl    | http://controller:9696           |
| region       | RegionOne                        |
| service_id   | 95237876259e44d9a1a926577b786875 |
| service_name | neutron                          |
| service_type | network                          |
+--------------+----------------------------------+

Install and configure Networking components on the controller node:

# apt-get install neutron-server neutron-plugin-ml2 python-neutronclient

Edit the /etc/neutron/neutron.conf.

# nano /etc/neutron/neutron.conf

Modify the below settings and make sure to place a entries in the proper sections.

[DEFAULT]
...
verbose = True
rpc_backend = rabbit
auth_strategy = keystone
core_plugin = ml2
service_plugins = router
allow_overlapping_ips = True
notify_nova_on_port_status_changes = True
notify_nova_on_port_data_changes = True
nova_url = http://controller:8774/v2


[oslo_messaging_rabbit]
...
rabbit_host = controller
rabbit_userid = openstack
rabbit_password = password
## Replace "password" with the password you chose for the openstack account in RabbitMQ

[database]
...
connection = mysql://neutron:password@controller/neutron
## Replace "password" with the password you chose for neutron database

[keystone_authtoken]
...
auth_uri = http://controller:5000
auth_url = http://controller:35357
auth_plugin = password
project_domain_id = default
user_domain_id = default
project_name = service
username = neutron
password = password
## Replace "password" with the password you chose for neutron user in the identity service.

[nova]
...
auth_url = http://controller:35357
auth_plugin = password
project_domain_id = default
user_domain_id = default
region_name = RegionOne
project_name = service
username = nova
password = password

## Replace "password" with the password you chose for nova user in the identity service.

Configure Modular Layer 2 (ML2) plugin:

Edit the /etc/neutron/plugins/ml2/ml2_conf.ini file

# nano /etc/neutron/plugins/ml2/ml2_conf.ini

Modify the following stanzas.

[ml2]
...
type_drivers = flat,vlan,gre,vxlan
tenant_network_types = gre
mechanism_drivers = openvswitch

[ml2_type_gre]
...
tunnel_id_ranges = 1:1000

[securitygroup]
...
enable_security_group = True
enable_ipset = True
firewall_driver = neutron.agent.linux.iptables_firewall.OVSHybridIptablesFirewallDriver

Configure compute to use Networking, edit /etc/nova/nova.conf on the controller node.

# nano /etc/nova/nova.conf

Modify the below settings and make sure to place a entries in the proper sections.

[DEFAULT]
...
network_api_class = nova.network.neutronv2.api.API
security_group_api = neutron
linuxnet_interface_driver = nova.network.linux_net.LinuxOVSInterfaceDriver
firewall_driver = nova.virt.firewall.NoopFirewallDriver

[neutron]
url = http://controller:9696
auth_strategy = keystone
admin_auth_url = http://controller:35357/v2.0
admin_tenant_name = service
admin_username = neutron
admin_password = password

## Replace "password" with the password you chose for neutron user in the identity service

Note: If you do not have a particular section, create and place stanzas onto it.

Populate the neutron database.

# su -s /bin/sh -c "neutron-db-manage --config-file /etc/neutron/neutron.conf --config-file /etc/neutron/plugins/ml2/ml2_conf.ini upgrade head" neutron

Restart compute and networking service on controller node.

# service nova-api restart

# service neutron-server restart

Verify it by listing loaded extensions.

# neutron ext-list
+-----------------------+-----------------------------------------------+
| alias                 | name                                          |
+-----------------------+-----------------------------------------------+
| security-group        | security-group                                |
| l3_agent_scheduler    | L3 Agent Scheduler                            |
| net-mtu               | Network MTU                                   |
| ext-gw-mode           | Neutron L3 Configurable external gateway mode |
| binding               | Port Binding                                  |
| provider              | Provider Network                              |
| agent                 | agent                                         |
| quotas                | Quota management support                      |
| subnet_allocation     | Subnet Allocation                             |
| dhcp_agent_scheduler  | DHCP Agent Scheduler                          |
| l3-ha                 | HA Router extension                           |
| multi-provider        | Multi Provider Network                        |
| external-net          | Neutron external network                      |
| router                | Neutron L3 Router                             |
| allowed-address-pairs | Allowed Address Pairs                         |
| extraroute            | Neutron Extra Route                           |
| extra_dhcp_opt        | Neutron Extra DHCP opts                       |
| dvr                   | Distributed Virtual Router                    |
+-----------------------+-----------------------------------------------+

Next is to Install and configure Network Node.